ZoneTable Plug-In for FEFLOW
Requirements | Installation | Data | Edit Window | Example | Support
Introduction
The ZoneTable plug-in was developed to simplify the definition and update of the following material properties:
- Hydraulic conductivity (Kx, Ky, and Kz),
- Specific storage (Ss) (compressibility), and
- Specific yield (Sy) (drain / fillable porosity).
The ZoneTableID array is used to define the material zones across every element in the model. This array, which is specified by the user in a "User Data" array in the FEFLOW interface, is a set of unique integer identifiers (ID values). Using the ZoneTable plug-in, the user can quickly view, edit, and add multiple property values across the entire domain of a large, complex model. The plug-in does not override or disable any of FEFLOW's standard tools.
The standard FEFLOW interface has two approaches to assigning material (and other) properties, by name or group, to elements:
- A global tool that applies to the entire model domain. This approach is accessed via the Tools >> Global Settings >> Parameter Lookup Table. This table allows the user to apply names to specific types of parameters so that when assigning values to elements, the user simply remembers the name and FEFLOW assigns the correct value. However, the named parameters can be assigned to any location in the model, so there is no correspondence between a named parameter and the elements it is applied to, and the application of the value is only performed at the time the element values are edited.
- A parameter zone approach: These are created by right-clicking a material property like K_xx or Transmissivity and selecting Create Parameter Zone. A range of values is then assigned and an entry in the Spatial Units panel is created. The name of this newly created spatial unit can be modified. When this spatial unit is activated, FEFLOW selects all the elements with values that fall in the range. For example, if a K_xx parameter zone called Ksand is created with a range of 1 to 10, then set as the current selection, all elements that have K_xx values between 1 and 10 are selected. These parameter zones can overlap: there is no one-to-one correspondence between a named selection and the value the selection is assigned.
- A table of named material-property values is tied to a specific distribution of elements, so that each value can only be applied to a user-defined set of elements; material zones cannot overlap. For example, granite and clay might initially be given the same or similar values of K and Sy. In the standard FEFLOW interface, the distributions of K and Sy would look identical, but they are very different types of hydrogeologic units. The ZoneTable plug-in allows the user to easily distinguish unique hydrogeologic units.
- Zones of materials can be defined in the model before the material properties are known or defined (or a table of values can be set up before spatial distributions are defined).
- Elements with undefined, invalid, or obsolete property values are easily identified.
- Not all elements need have look-up table values. Some or all elements in the ZoneTableID array can remain undefined so that other approaches to defining their properties can be used. The plug-in does not override or disable any of FEFLOW's standard tools.
- Using the plug-in's lookup table:
- Zones can be named,
- Property values can quickly be viewed, edited, and applied across models of any complexity,
- Property values of different materials can quickly be compared, and
- Property values can quickly be copied from one to another (for example, K_xx can be copied to K_yy).
- Using the plug-in's Zone Lookup Table simplifies application of parameter estimation tools like PEST or UCODE, because a small, external file is easier to update than a large, complicated FEM file.
Using only zones does have two disadvantages:
- Material values may have a range of values within a zone. Kriging or some other estimation technique might be more appropriate for defining material values, rather than applying a single value for the zone. However, the plug-in does not limit the user to ability to apply any of the standard tools in FEFLOW.
- Transient variation of material values is not supported in this version of the plug-in.
Requirements
The ZoneTable plug-in's minimum requirements are:- FEFLOW 6.2 (build P9 or newer recommended),
- 3D models with triangular or quadrilateral elements, and
- Microsoft Windows 7, 8, 10
- 2D models, or
- Transient material properties.
Installation
To Install the Software ...
The IFM plug-in can be installed anywhere on your computer system but there are two common locations. It is recommended the ZoneTable plug-in be installed in:
- C:\Users\Public\Public Documents\WASY FEFLOW 6.2\sdk\ZoneTable\
- C:\Program Files\WASY\FEFLOW 6.2\modules32\
- C:\Program Files\WASY\FEFLOW 6.2\modules64\
Add the Plug-In to the FEFLOW Interface
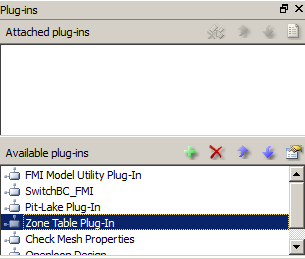
The plug-in is added to the FEFLOW interface via the Plug-ins panel (View >> Panels >> Plug-ins). The plug-in can be added either with or without a FEM file open. Next, press the green "+" button next to Available Plug-ins. Search for and select the ZoneTable_x64.dll (or 32-bit version). The Plug-ins panel will look something like:
Activate the Plug-In
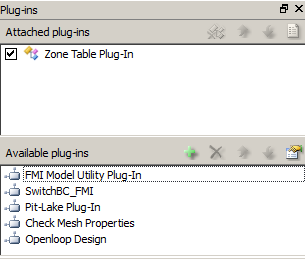
To activate the plug-in, it must be attached to an open FEM file. On the Plug-ins panel, under Available Plug-ins, right click on Zone Table Plug-In, and select Attach. ZoneTable will then be listed under the Attached plug-ins portion of the panel. The plug-in is now active (attached) and ready to use.
Plug-in Data
The ZoneTable plug-in uses two types of data. One type is a User Data elemental distribution named ZoneTableID. The second data set is a table defining the zones properties.
The ZoneTableID Elemental Distribution
The ZoneTableID elemental distribution array can be created manually by the user, or be created using the ZoneTable plug-in window. The array will be located in the Data panel under User Data. If not using the plug-in to create the array, refer to FEFLOW's documentation.This data array holds integer identifiers (ID's) to identify each zone of the Zone Lookup Table. Any ID for an element is valid, but only zones with ID's greater than zero will be operated on by the plug-in. Elements with zone ID's less than or equal to zero will use existing values of Kx, Ky, Kz, Ss, and Sy. These existing values must be defined by the user via FEFLOW's standard tools.
Tips:
- It is recommended that zone ID of zero (0) be reserved for undefined elements. This allows the user to quickly identify all undefined elements.
- Zone ID values do not have to be consecutive. Your workflow may be facilitated by grouping ID's for similar materials. For example, you might have zone ID's set to 10 (sand), 11 (silty-sand), 12 (clayey-sand), 20 (clay), and 30 (gravel).
- Even if a zone of elements will not be assigned values via the plug-in, because the corresponding value in the Zone Lookup Table is less than or equal to zero, it is recommended they be assigned a zone ID anyway. This would allow you to select and edit such zones quickly using FEFLOW's standard tools. The idea is that the zone ID's represent unique types of material.
- To avoid confusing defined and undefined zones, it may be best that there not be (+) positive ID's with a corresponding (-) negative ID. For example, avoid having an ID of +10 and one of -10. Because the user can quickly disable or enable zones by changing the sign of the zone ID values, using this approach will prevent ID conflicts.
ZoneTable's Lookup Table
The lookup table contains the following information for each zone:- Zone ID (this must be an integer and it must be unique)
- Zone Name (spaces are allowed, but special characters like "," and "!" are not)
- Kx
- Ky
- Kz
- Ss
- Sy
The plug-in will alter material-property values (Kx, Ky, Kz, Ss, and Sy) of any element if the corresponding value in the Zone Lookup Table is greater than zero (0) and if the zone ID is defined in the ZoneTableID array:
- If the zone ID is less than or equal to zero (0), the zone is disabled and no elemental material property values will be altered by the plug-in, or
- If the zone ID is greater than zero (0), but a property value in the Zone Lookup Table is less than or equal to zero (0), the plug-in will not alter the material property of the element.
ZoneTable's Edit Window
Editing of the plug-in's lookup table, other settings and functions are accessed from the FEFLOW Plug-ins panel. After attaching the ZoneTable plug-in, the edit window is accessed by right-clicking on Zone Table Plug-In and selecting Edit ... in the pop-up menu.

If the ZoneTableID array has not been defined, you will see the Initialize Zone Table tab displayed instead of the Zone Lookup Table tab.

Clicking Create ZoneTableID Array will create the ZoneTableID array. The plug-in will set all the elemental values to zero (0), which means the ID of every element in the model is initially undefined. No entries will be created in the Zone Lookup Table, nor will any existing entries be deleted (the table can be set up before the array is present). If ZoneTableID already exists, the Create ZoneTableID Array button is deactivated. An example table Zone Lookup Table is shown below.
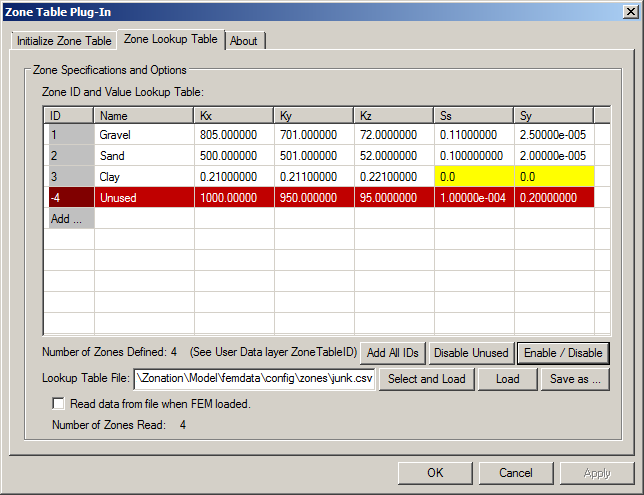
Once the ZoneTableID array has been created, the plug-in will switch to the Zone Lookup Table tab. On this tab, the property values for each zone are defined with the ID in the first column, the name of the zone in the second column followed by material-property values for the zone. The ID is used to assign the specified values of material properties to elements having the same ID assigned in the user data array ZoneTableID.
The plug-in stores the Zone Lookup Table information in the FEM file and this information will be read by the plug-in when a FEM file
is opened in the FEFLOW interface. However, if the plug-in is active, and if the user checked the box next to Read data
from file when FEM loaded, the plug-in will read the lookup-table information from the specified external CSV file when the
FEM file is opened, and the data
from the external file will replace any lookup-table data that was stored in the FEM file.
When the FEM file is saved, the information that was imported from the CSV file will be saved in the FEM.
Use of an external CSV file instead
of the data stored in the FEM is efficient when running FEFLOW from the command line, for example when performing parameter
estimation, or handling large lookup tables.
NOTES:
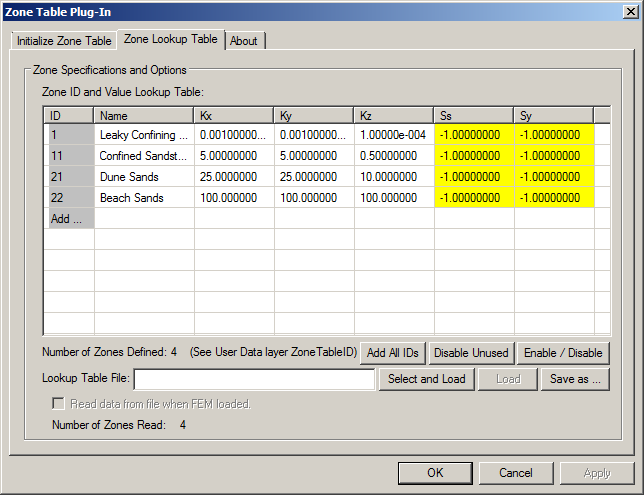
Red Highlight: The data in the rows is disabled and the zone ID is negative, which means that the zone is NOT used to specify any material properties. The data in these rows cannot be edited unless Enabled via the Enable / Disable button (described below). Yellow Highlight: Indicates a specific material property that is disabled (property value ≤ 0.0) for an enabled zone. The value of the property in the corresponding Material Property will NOT be altered by the plug-in, but other materials in the zone will be if their values are greater than zero.
- Add All ID's: After the user defines all of the zone ID's in ZoneTableID, clicking this button will create one record in the Zone Lookup Table for every Zone ID found in ZoneTableID.
- Disable Unused: Clicking this button causes the plug-in to parse ZoneTableID and the Zone Lookup Table to find and disable extraneous data. For example, if the user changes all zone ID's of 11 to 12 in ZoneTableID, this button disables the ID = 11 record in the lookup table (the record will be highlighted in red). The user can then select and delete the record if desired.
- Enable / Disable: Because zone numbers cannot be edited after they are first created, this allows the user to switch the zone number from positive to negative (or negative to positive). This function can only be used on one selected zone ID of the lookup table at a time. To use it, first select a row by clicking on it, and then click the button. This will toggle the sign (+/-) of the Zone ID. Disabled ID's will be highlighted in red and cannot be edited until re-enabled. Note: If the sign of the Zone ID cannot be changed without conflicting with another zone ID, the current state of the selected zone will not be toggled and the user will be notified of the conflict.
- Lookup Table File: Specifies the location and name of an external CSV file for lookup table data. The data in the file can be imported by clicking Select and Load (or Load if the file name and location were previously specified), or exported by clicking Save as.... For imported CSV files, use comma or tabs to separate fields.
Using ZoneTable
When active, the plug-in modifies the Kx, Ky, Kz, Ss, and Sy values when:- The FEM file is opened. Depending on what options you have set, this may be from ZoneTable data stored in the FEM file, or from a CSV file. This is so that if you are using the FEFLOW GUI interface, material properties are correctly updated in the model views.
- You click OK on the ZoneTable plug-in window. All open views will be updated automatically.
- The user starts the FEM model simulation. This ensures that any changes made to the ZoneTableID array will correctly update material properties, as defined in the Zone Lookup Table.
The plug-in will not alter any property values of elements that are either undefined in the ZoneTableID array (zero or negative zone ID's), or that have undefined values in the Zone Lookup Table (zero or negative property value).
Example
A simple model was designed to test the ZoneTable plug-in and to provide a step-by-step example of how to use the plug-in. This example assumes that the user understands the use and terminology of FEFLOW version 6.2.The three-dimensional, steady-state test model is 100 m by 100 m by 50 m with 20 layers of equal thickness (2.5 m per layer). It has a triangle-based prismatic mesh with 1024 elements per layer, and all elements have the same size and shape. The top 16 layers represent an unconfined aquifer with specified head nodes on the west side (slices 1-3) at which head is set to 50 m. Another set of specified head nodes is located along the east side (slices 3-5) at which head is set to 40 m. The unconfined aquifer is divided into two types of sand. Below the unconfined aquifer is a confining bed (two layers), and below that is a confined aquifer represented by two model layers. In the confined aquifer, specified head nodes are located along the west side (slices 19-21) at which head is set to 75 m.
This example illustrates the process of adding zones and creating a zone table for an existing model.
- Open example\femdata\ZoneTableID.noZones.fem. This file should be located in the directory with the ZoneTable plug-in files.
- Open the Plug-ins panel (if not already active, go to View >> Panels >>Plug-ins).
- If ZoneTable is not in the Available plug-ins list, add it according to the Installation section.
- Right click on Zone Table Plug-In and select Attach. The model will now use the ZoneTable plug-in. Note: The check box next to the plug-in name allows you to deactivate the plug-in without actually detaching it.
- In the Attached plug-ins section of the panel, right click on Zone Table Plug-In and select Edit ....
This will bring up the ZoneTable Edit window:
- Click Create ZoneTableID Array, then OK to close the Edit window. This creates and populates the User Data array ZoneTableID with a default zone ID of zero (0).
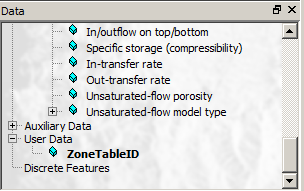
- Click on the Data panel (or its tab if docked) and scroll down to the User Data section.
You will see the ZoneTableID elemental array. This is the array of integers that links each element
of the model with zones in the Zone Lookup Table.
- If not visible, open and select a 3D View (Window >> New >> 3D View, or Window >> Activate >> then select a 3D view). Note: Although this example uses 3D views to work with the plug-in, 2D Slice views can also be used to edit plug-in ID's and Cross-Section views can be used to view zone ID's.
- Double click on ZoneTableID to select it for viewing and editing. All elements have been pre-populated
with a zone ID of 1.
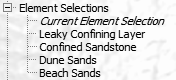
- Go to the Spatial Units panel (View >> Panels >> Spatial Units). You should find four element selections
made for the purpose of this example (the plug-in does not create or modify Spatial Units). These are located
below the Domain section of the panel:
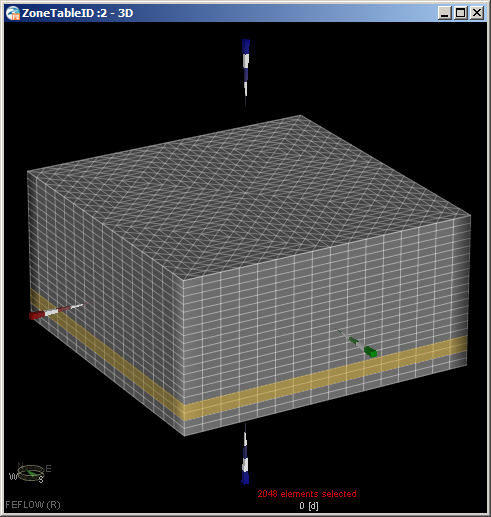
- Double click Leaky Confining Layer to select the elements in this user-defined spatial unit to show the location
of the confining layer.
- Set the zone ID for these layer element values to one (1) using the Editor toolbar (View >> Toolbars >> Editor).
- Double click Confined Sandstone and set the elements values to 11 (zone ID's do not have
to be numbered consecutively).
- Double click Dune Sands and set the elements values to 21.
- Double click Beach Sands and set the elements values to 22. The two types of unconfined sand, which have
similar properties, are assigned similar zone ID's as a
convenient way of associating the two in a group.
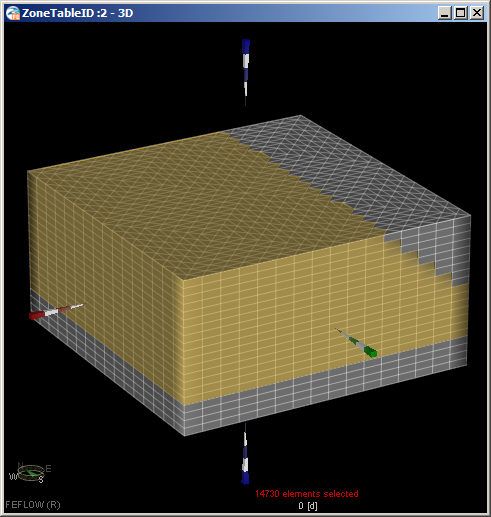
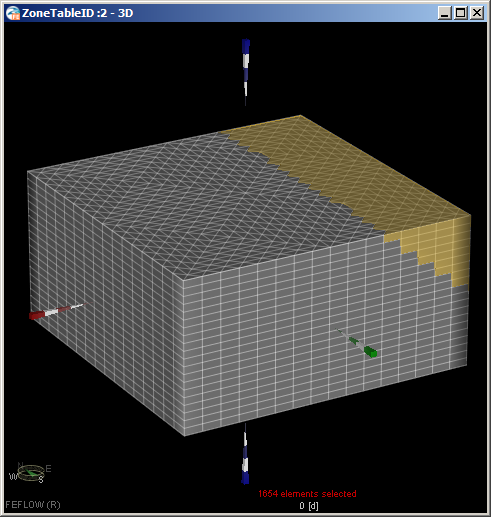
- Deselect all elements. At this point, every element has been assigned a set of zone ID's that
will be used in the example. It may be a good time to adjust the color palette for the ID's so
all zones are easily differentiated, but this is left as an optional exercise for the user. The
Zone ID distribution should look like:
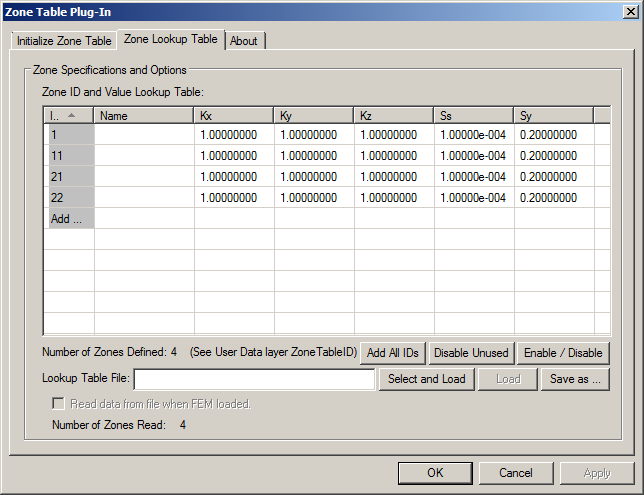
- Open the plug-in's Edit window. The Zone Lookup Table tab will be displayed with the
default zone (ID of 1). Click Add All ID's. There should be an entry for Zone ID's
1, 11, 21, and 22.
- The value of each property for each zone could be typed in by hand, but we will import the data from a CSV file instead. Click Select and Load, and select the file example\import+export\ZoneTable.example.csv.
- At this point, all the necessary material properties have been defined and the model is ready to run.
Note that negative Ss and Sy values have been specified because this is a steady-state model.
The Zone Lookup Table should look like:
- Click OK to close the window and apply the changes to the model. Note that although ZoneTableID is the actively edited parameter in the FEFLOW interface, the plug-in has modified the values of Kx, Ky, and Kz according to the specifications the plug-in's Zone Lookup Table and ZoneTableID
- Before running the model, we will check a few things. First, confirm the 3D view is selected. Next, in the Spatial Units panel, scroll to the top and click Domain to set the spatial unit to the whole domain instead of the last selected spatial unit, so that in the next in the step, the K_xx of the entire domain will be displayed.
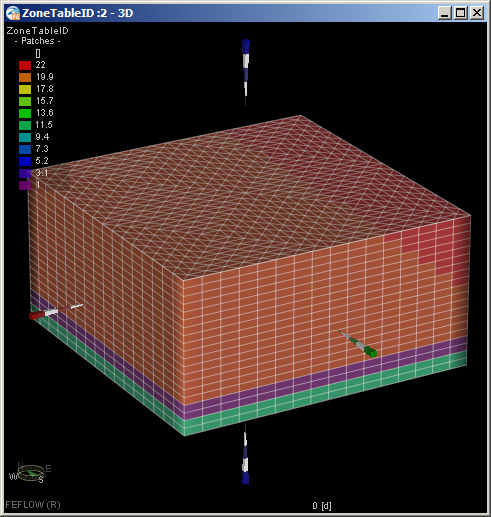
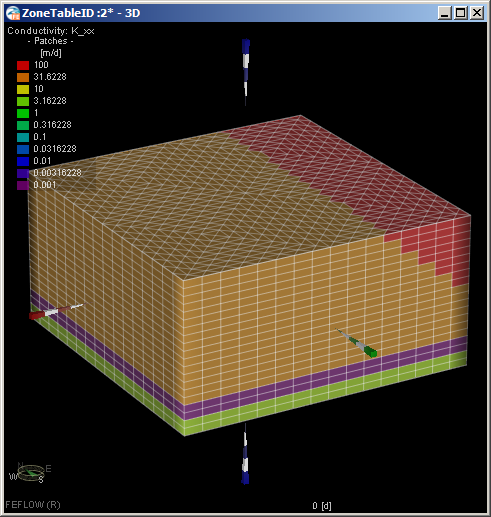
- In the Data panel, select and double click the K_xx array, which is under Material Properties >> Conductivity >> K_xx.
This adds K_xx to the active view and selects it for editing. The K_xx array is displayed, and values in the legend should
vary from 0.001 m/d to 100 m/d:
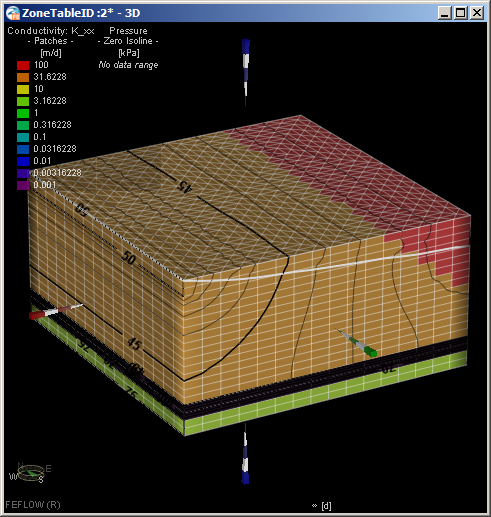
- Run the model. Depending on how the View Components panel is set up, the results will look something like:
- There is an additional file included with the example that provides the final resulting FEM: \example\femdata\ZoneTableID.withZones.fem